A straight razor
(NOTE: Quality of these razors has improved somewhat since this was first written and it is not quite as imperative that you do anything special in order to hone these razors. The bevel angle is still a bit fat, and the razors are still cheap enough to burn up a few in the cause of science, so feel free to mod away at them!)
You will often see me referring to a "straight razor" as simply a "razor". This was the only sort of razor that there was, at one time. The name "razor", therefore, is already taken. A "straight razor" is not a specialized tool, but is the original, plain vanilla type of shaving device. "safety razors" are the different ones. They are the usurpers. OUR sort of razor is the normal, ordinary sort of razor. So, therefore, ergo, id est, RAZOR. PERIOD.
Okay, now let's see just what a razor IS. An ordinary razor is nothing more than a sharp piece of steel used for shaving, usually sandwiched between two pieces of horn, bone, plastic, wood, ivory, whatever, called "scales", separated at the closed end by a piece of material called a Wedge. A razor does not have a handle. The scales are not a handle, because the razor is not held by the scales in use. So please, never call the scales of a razor, a "handle". It professes ignorance to do so.
Well, actually there is more than that. MUCH more. Most of it is directly related to the "sharp" part of the description. The remaining details are mostly about the "shaving" part.
When describing something on a razor the convention is to picture the razor standing on edge, open, with the spine up, the tang and scales to the right, the nose of the razor to the left. The side of the blade you are looking at is the "Show" side. It is often decorated with stamping on the tang, engraving on the spine, gold wash, or etching on the blade, and sometimes emblems, inlays, etc on the scale. The hidden side is the "Back" side, and is plainer, though it may have some embellishment, too. When displaying a razor, generally we present the Show side out toward the viewer.
So, to the right are the scales. We know what they are, right? They are attached to the razor at the Pivot, with a Pin and Washers. The Pivot hole in the razor is drilled through the Tang. The very end of the tang typically curls upward in a Monkey Tail. The part of the Tang between the Pivot and the Blade is sometimes called the Shank. See if you can identify those parts or things.
Notice the Wedge pinned between the big ends of the Scales. This spaces the big end of the scales the correct distance apart, and applies an outward spread to the scales so that they curve back inward slightly at the pivot. It has a definite taper, though it is not unheard of to have a flat Spacer instead of a tapered Wedge.
The Blade has a thickened rib-like structure at its top, called the Spine. The Spine does more than offer stiffening and support for the blade. It also sets the all-important Bevel Angle, which I will describe shortly. A smaller rib-like structure runs from the Spine down to the Heel of the blade at the shaving edge. This is called the Stabilizer. Some razors do not have one. Some have two. At the top of the Stabilizer on the shank is a protrusion called the Shoulder, which marks the limit of the blade grind. Some razors have no Shoulder, mainly the ones that have no Stabilizer, either, and these are called Shoulderless razors.
So you probably figured out where the Heel is. It is the corner of the edge that is closest to the hand. The far end of the edge is called the Toe, naturally. The tip of the blade is called the Nose, and it may be squared off, rounded, slanted, or concave. It may also have a Barber's Notch in it. You will notice that the blade is not a flat plane between edge and spine, usually. It is hollowed out, as if by a grinding wheel. This is the Hollow Grind. There are razors with no Hollow Grind but instead are wedge shaped, and these, logically, are called Wedge razors. Our common type is the Hollowground razor. The Hollowground razor is a relatively new refinement on the original Wedge type, that offers many advantages. It is much easier to hone, and generally shaves better, though some will argue that point when they have a Wedge that is properly honed by someone who understands them.
A straight razor
One part of the razor, the most important part, is sort of hidden. It is more a concept than an object, actually. This is the Bevel.
What most people think of when they speak of the Bevel is the flat strip of highly polished steel along the edge, left by the Honing process. We don't speak of "sharpening" a razor. It is called Honing. But that is only part of the Bevel. Think of the Bevel as a semi-imaginary wedge shape, with the spine at the thick part and the shaving edge at the sharp part. In a way, the Bevel is what the razor would be, if it were not hollowground. The two sides of the Bevel are planes that meet together to form the shaving edge, and are held apart at the wide edge by the thickness of the spine. These two faces of the Bevel are the planes where the blade and the hone can interact. The Hone forms these two planes in the Honing process. In the grinding process, actually, but they are further refined and adjusted in Honing.
You can think of honing in this way... there is a piece of steel forged or ground or both into the general shape of a razor, but the real razor is hidden inside, and Honing is the controlled, precise removal of all steel that is not part of that inner perfect razor. As you hone more and more steel off the bevel surface on each side, the flat bevel surface on the sides of the blade at the edge get closer together. The planes already meet, but they meet somewhere "out there", and by honing the bevel surfaces, we make the two planes intersect closer and closer to steel until they DO meet at a steel edge. After more honing, the bevel meets in an edge on the steel along the entire length of the blade. When this has been achieved, it is said that the Bevel is Set.
The Spine, as you may recall, sets the angle of incidence between the two planes of the bevel. The way this happens is while honing, the spine is laid right on the hone, along with the edge. The thickness of the spine sets the Honing Angle. The existence of the spine and the reliance upon it to set the Bevel Angle also keeps the Honing Angle extremely consistent. If the Honing Angle were randomly varied, the edge would not meet in a true Bevel intersect. Instead of in a nice sharp isoceles triangle cross section, it would be rounded, especially at the very apex of the edge. Hmmm... triangle, sharp. Round, dull. Right? So the Bevel is a concept, but it is also a physical feature of the razor. The Bevel can be seen at the edge. It exists but is not visible where it crosses the vast gulf of the Hollow Grind. Then, it is visible again, on the spine. It is visible in those two places because steel on the inner surface is THERE, and steel that WAS on the OUTER SURFACE, is NOT there anymore. Instead, we see a very flat strip of shiny steel on spine and at the edge, on either side of the blade.
If you consider a cross section of the blade, and draw two lines to represent the cross section of the bevel planes, they intersect at the edge and form a very special angle, the Bevel Angle. The Bevel Angle determines the major characteristics of the razor, such as the greatest possible cutting ability, or the ruggedness of the edge. All properly honed or sharpened cutting instruments have a bevel angle. Sometimes more than one, but we will get into that later. A pocketknive has a bevel angle more Obtuse than a razor. An axe has a bevel angle even more obtuse. A chisel, even more so. If you sharpened a chisel with a true razor edge, that is to say with a typical razor bevel angle, you could possibly shave with it but if you used it as you would normally use a chisel, the edge would last about 1/1000 of a second. It would be too delicate. Same with an axe, a machete, an oyster knife, or a paring knife. A razor has one of the most delicate edges that is commonly put on steel.
So, a smaller bevel angle, in other words a more Acute bevel angle, is better for a razor, right? Well, up to a point. There are practical limits. The type of steel and the heat treating and tempering process dictate the minimum bevel angle. The act of shaving dictates how obtuse it can be. There is then, a range of permissible angles for the bevel, and a sweet spot near the middle where we can expect peak overall performance. This sweet spot is typically around 16-1/2 degrees but it can vary slightly with the grind of the blade and the qualities of the steel.
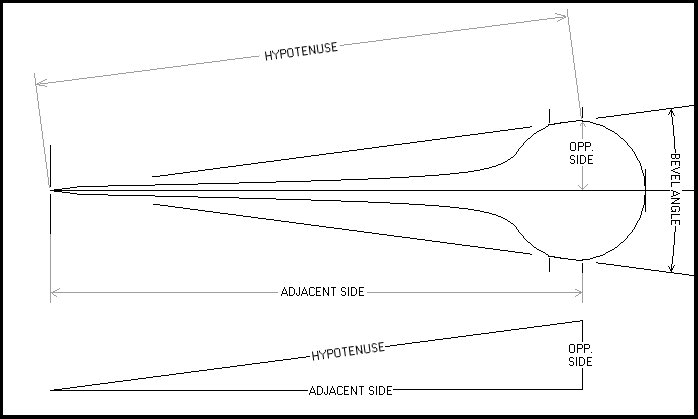
So, obviously there is an ideal ratio between the width of the blade and the thickness of the spine. Actually, not quite. Going back to our imaginary cross section, we see that the bevel angle is determined by the length of the long sides of our imaginary bevel triangle, and the length of the base of the triangle. The actual overall width of the blade is junk data. Strictly speaking, so is the spine thickness, though in practice this value is the same as what we are actually using. It is convenient to divide this isoceles triangle into two identical right triangles, in order to use the simple S=O/H formula. The bevel triangle is split right down the middle, from edge to the middle of the spine. Taking one of these right triangle children of the bevel triangle, we see that we cannot truly measure the Adjacent side of the acute angle, but we can easily measure the Hypotenuse of the triangle. Measuring from the very top edge of the bevel on the spine, down to the shaving edge, gives us the Hypotenuse, the "H" of our formula. One half of the spine thickness is the Opposite side of the right triangle. It is called Opposite because it is the side of the right triangle opposite the angle to be solved. It is the "O" in the formula. Technically, to measure the Opposite side, we measure from the top edge of the spine bevel on one side to the top edge of the spine bevel on the other side. In practice, this is nearly always the thickness of the spine. Just be aware that even though you are simply measuring the spine thickness, you are actually measuring between those two points. So divide half the spine thickness by the hypotenuse, and you get "S". S stands for the Sine of the angle to solve for. By finding the angle that has that value for its Sine, we find therefore the angle of one of our right triangles. Doubling that angle gives the bevel angle.
So why not just divide the thickness by the hypotenuse, instead of divide the thickness by two and then double the angle? It won't be right. It will be a bit off. Not much, but some. Maybe not enough to matter, but it is just as easy to just do it right and BE right.
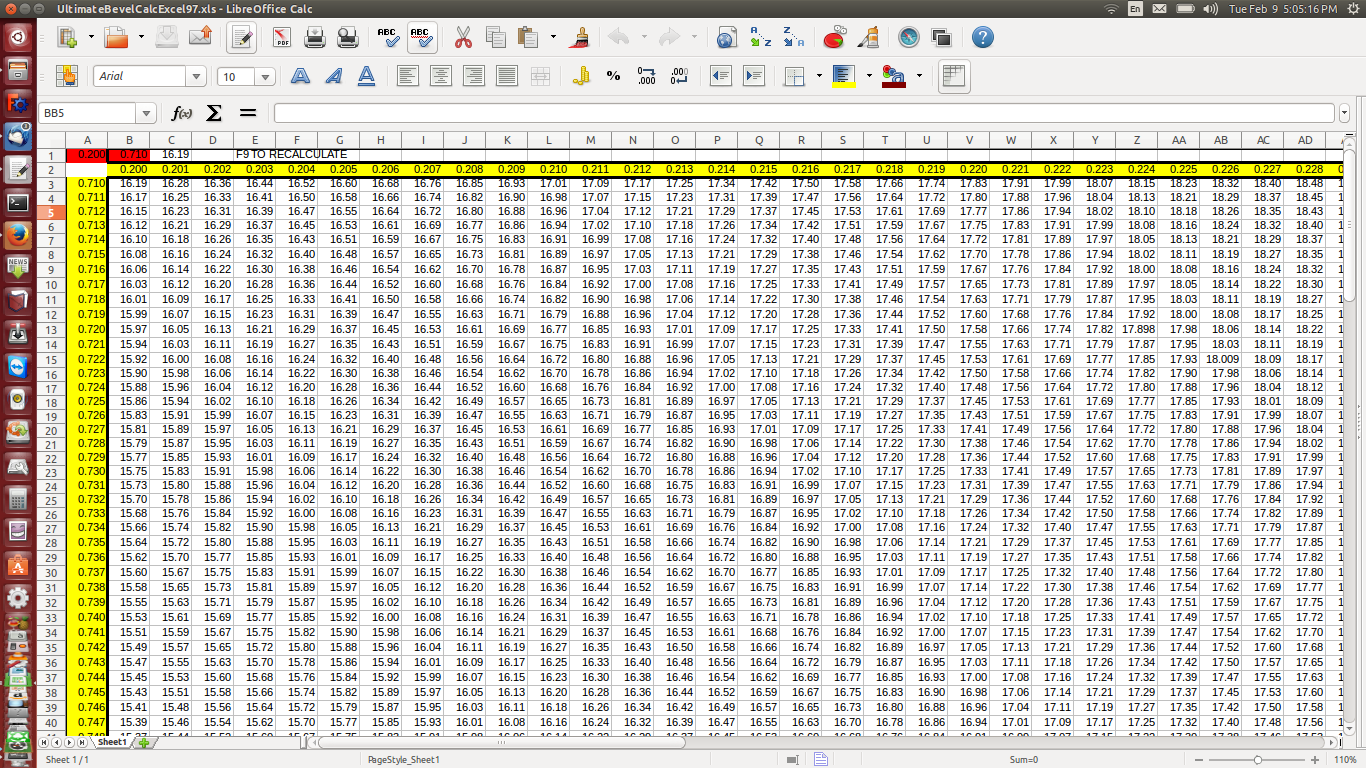
These calculations are quick and easy on a good calculator. I use a spreadsheet. I enter a value for spine thickness and another for hypotenuse, and the spreadsheet automatically populates a table with a bunch of additional measurable values and the resulting bevel angles. This way I can see where I am at and see how much i have to go while grinding a razor. Download the "bevelcalc" attachment and open it with OpenOffice, LibreOffice, MS Office, or whatever spreadsheet app you use. Take a razor that you have, measure the measurements about midway along the blade, enter the values in the spreadsheet, and you can see what the bevel angle of the blade is. Cool, or what? Okay, nerdy. So it seems NOW.
Actually, remember how there is an optimum range for bevel angle? Well, if yours is too acute (skinny) or too obtuse (fat), you are going to have sub-optimum performance. Too acute and the edge cannot be supported. It "crashes" or collapses when used, or sometimes crashes even before the honing is finished. A too acute bevel can be remedied easily enough. By applying a layer or sometimes two layers of electrical tape to the spine when honing, we are increasing the bevel angle through a practical increase in spine thickness. We are also protecting the spine from further wear while honing. Normally it is expected that the spine and edge will wear together, in proportion, and preserve the original bevel angle closely. In some rare cases, through poor design or poor honing, the razor ends up with too tight a bevel and so preventing wear to the spine allows wear to the edge bevel to sort of catch up, over a period of many many years. Meanwhile the tape has the immediate effect of increasing the bevel angle by a degree or two. It is common to hone such a razor with no tape or only one layer of tape, and at the final stage of honing to add a layer, which creates a micro bevel at the very apex of the edge, on top of the main bevel. This gives fairly good cutting power and a reasonably robust and dependable edge. If the razor hones okay and shaves good, obviously the bevel angle is okay, but if there are problems, one thing to check is the bevel angle, and an acute angle can be remedied by honing with tape. Honing with tape under normal circumstances is kinda dumb, but in this situation it can save a razor.
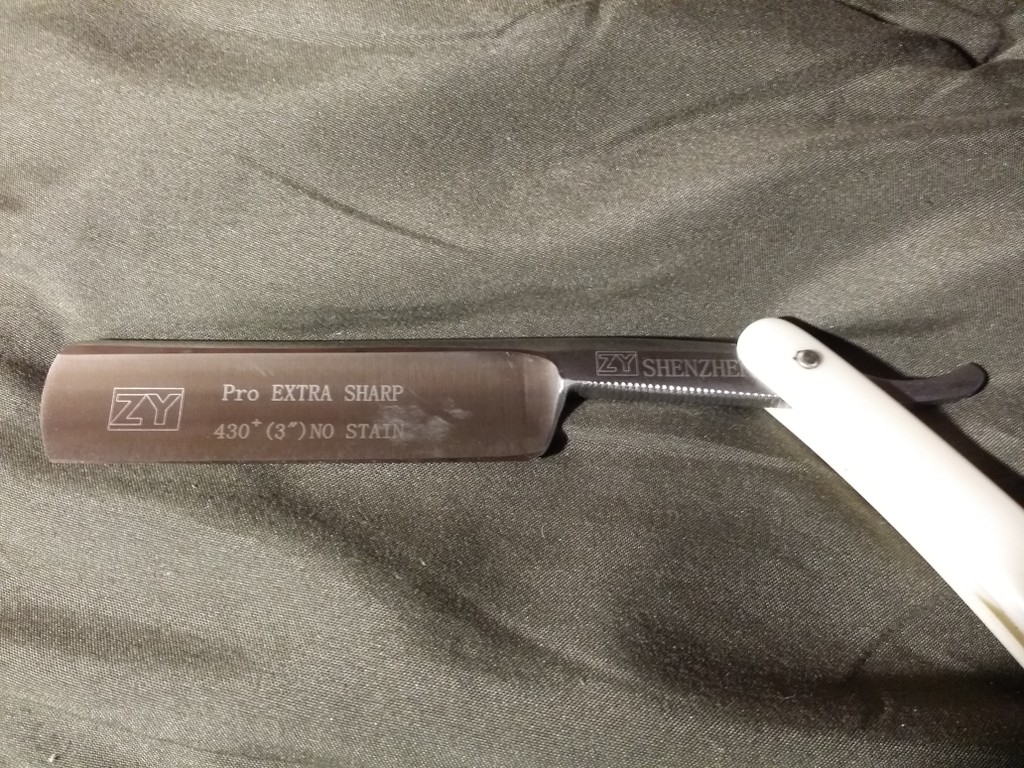
But this forum is all about Gold Dollars. If you measure and calculate a Gold Dollar #66 bevel angle, you will be shocked to find that it is somewhere between 18 and 19 degrees, well out of the sweet spot, and getting close to a point where it can no longer function as a razor. Same for the similar ZY430+, or a Titan. This is one reason even a honed GD is dismissed by many shavers, though it can be a favorite of newbies. A well honed stock GD66 is a very mild razor, and will just cut whiskers but on the other hand will seldom cut skin. What we really want to do is turn the mild clunker of a razor into a wild race car of a razor. So when we modify a GD66, one of the things to do is slim down the spine. The bevel angle is determined by the ratio of spine thickness to bevel hypotenuse, and we cannot add steel to the edge but we can subtract steel from the spine. It needs to be done in a controlled manner, to a calculated value. That is why it is important to understand bevel angle and how to find it.
One of my early GD conversions was an eye opener for me. It was the first time I deliberately ground the spine thinner, in order to achieve a better edge through creation of a more acute bevel angle. I was so proud of my handiwork when I was done! It looked good. Felt good in the hand. Honed up okay, shaved better but still not what I was looking for. I decided to figure out how to precisely measure the bevel angle, and I was disappointed to find that my new bevel angle, after all the grinding and honing and stuff, was about a half degree less than a stock GD66. All that work and it was a half degree improved. That's when I truly began to understand that the bevel angle is not just for nerds, but is important for any serious modder to understand and be comfortable with finding.
The attachments below are an illustration of the bevel angle and the right triangle that must be solved, and the second one which probably only appears as a link to dowload, is my bevel calculator spreadsheet. Feel free to download and use it, or share it or modify it for your own use. The two red cells in the upper left corner are where you enter a spine thickness and a hypotenuse. Clicking on any cell in the table makes your spreadsheet app recalculate all the values. You will see along the left edge are values for the hypotenuse length. Along the top edge are values for the spine thickness. The main part of the table are corresponding bevel angles, to .01 degree.
For those curious to see the spreadsheet but not curious enough to download and open it, here is a screenshot. I use Ubuntu for an operating system and LibreOffice for an MS Office substitute, but OpenOffice or MS Office or any other similar program will open it just fine, possibly with slightly different appearance.
If you visited the Basic Honing thread, (not up yet) or already knew how to hone a razor, you may have tried to hone a GD right out of the box at some point. Very likely, you had a really tough time with it, maybe were plain unsuccessful, and achieved little more than frustration and worn out film or stone. Examining the razor tells the story. Typically the bevel looks kinda okay sorta maybe over part of the blade, but at the heel the bevel flat widens out considerably near the stabilizer, due to very poorly executed factory grinding. Maybe the stabilizer shows evidence of having jumped up onto the hone, which of course elevates the heel off the hone. The same effect is noted at the spine, next to the shoulder. The quick and dirty fix is to remove the entire heel portion, eliminating the stabilizer, and then grinding the shoulder down and fairing everything smooth as if it never existed.
If you so a web search for Dovo Bismarck, you will see a shoulderless razor that looks good and handles great, whether honing or shaving. Notice the swoopy profile where the shank blends right into the blade. That is what you want to achieve on your modified Gold Dollar. So the heel is replaced by what is often called a "Thumb Notch". Looks good, hones good, shaves good.
If you think about stuff you look at, you can understand how even a perfectly executed shoulder can in time interfere with honing, after much hone wear. The shoulder acts as a stop, preventing the shank from riding up on the hone. After considerable honing wear over a considerable span of time, the spine will have worn, but not in precise lines and planes as if machined. Particularly adjacent to the shoulder, hone wear will have ground a sort of rounded step in the steel. You can deal with this, to a point. But let's say the shoulder is GONE. Yippee! Honing freedom! No more a honing slave to a tyrannical shoulder! But it's not a good thing, no.
When honing, a step is still worn in the spine. The step is very "staggery" and the razor can creep up on the hone to a point where the shank elevates the heel of the razor. When this happens, the heel is not contacting the hone, but the toe is being forced down into the hone. Bad honing. Tapered blade. Might hone up okay, (with careful attention to the parts that get little love due to the step effect and the elevation of the heel), shave okay, but looks like total crap.
What is really desired, then, is for the spine, the part needed for maintaining the bevel angle, to be thicker, CONSIDERABLY thicker, than the shank of the razor. Can't make the spine thicker, and as we have already seen, for a GD66 that would be the last thing you would want to do, anyway. But thinning the shank, even the entire tang, is definitely possible. As a plus, you can get rid of that awful trademanrk stamped into it.
To thin the shank, you first need a good idea of how thin to make it. A good initial thickness for the spine is about 0.215" thick, and so a good initial thickness for the tang is about 0.200" thick, maybe a tiny bit less. You may want to taper the shank from top to bottom, to ensure that it all lies completely inside the bevel angle by a good margin.
So, now you know the three main functional improvements to make to a GD66. In theory, at least. Now let's see how best to actually do the thing.
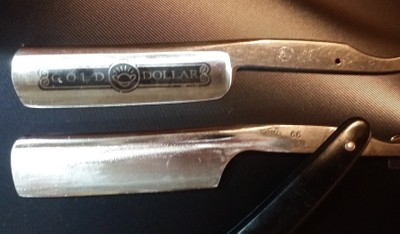
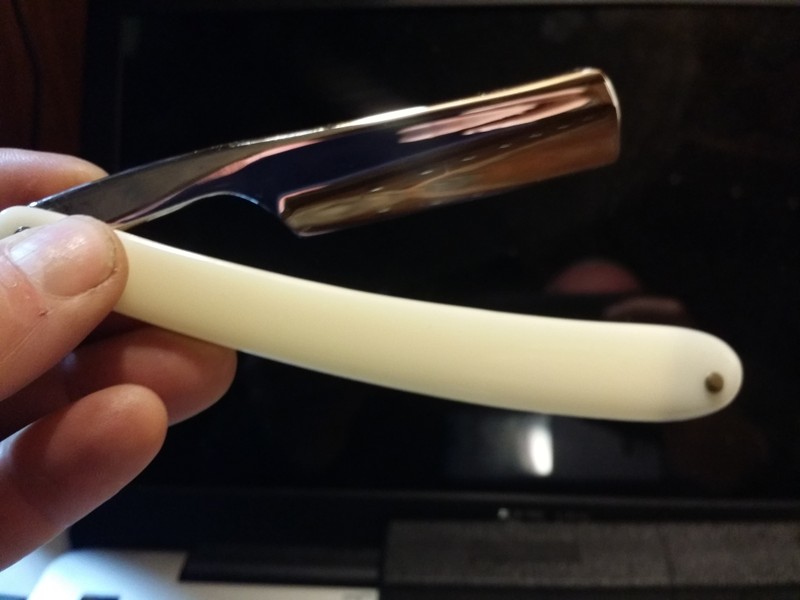
See the pics below. The first one shows a stock GD66 with the scales removed, and one that has been roughly modded and then pinned back into the original scales. The second pic shows a typical GD66 more fully modded and finished, in custom acrylic scales. That razor is one that has been in my regular rotation for 2 or 3 years and is a very frisky sports car of a razor.
The Dremel is a wonderful tool for razor modification or repair. The Dremel is also a terrible tool to have within 10 feet of a razor. What part of all that don't you understand? The Dremel is versatile, powerful, nimble, and just plain capable of doing razor magic. It is easy to handle, and capable of precise steel removal. It also rotates at about 30,000 RPM, and can catch an edge or corner of a piece of steel in a microsecond. The results are usually a shattered razor but could include loss of an eye, or a bad cut, whatever. Nobody listens, everybody thinks they can do it better than all those guys who have Dremelphobia. Then, you find out, hopefully the first time you shatter a razor, not the 37th time. Stupidity is doing the same thing all over again and expecting different results this time. Well, I will be careful. I learned my lesson. I can do it this time. Then, Dremel strikes again. Like Charlie Brown trying to kick the football, and Lucy says she will hold it for him this time, just like she said last time and the time before, but this time she really really really REALLY means it, HONEST! Or think of the Dremel as something akin to Charlie Brown's kite-eating tree. Razor-eating Dremel. Razor destroying Dremel. Well, if you learn your lesson the first or third or nineteenth time and exercise caution and don't do it the same way that failed before, you can do it. Just remember the Dremel is like a coiled rattlesnake in the middle of your bathroom. Maybe you can carefully enter and brush your teeth and shave, and not get bit. Maybe you can take a shower, and remember not to step on the rattlesnake when you get out. Maybe maybe maybe. Then, you get up in the middle of the night needing to answer nature's call and half asleep, step on Mr Rattles as you stumble toward the terlet and whammo, he strikes. That's the Dremel. You can expect to destroy at a bare minimum, at least one or two razors.
Dremels destroy razors not only by catching them with the insanely fast turning tool, but also with heat. The grinding action creates heat through friction. Too much heat pulls the temper, rendering it useless.
Razor steel is very hard partly because it is Heat Treated. Before any cutting or grinding, it is annealed, meaning it is heated to a certain temperature, held for a "soak" period, then allowed to cool at a prescribed rate. This makes the steel as soft as it can possibly get, making cutting and grinding easy. After that, it is Heat treaded. The HT process in a nutshell is a couple of cycles of heating and slow cooling called normalization, which reduces internal stress in the steel, and then heating to the point where a magnet no longer sticks to it, and quenching the steel generally in some liquid such as water or oil. After the quench, the razor should be at peak hardness. Different steels have different optimal HT temps and different preffered quenching agents and temps. The sudden contraction of the steel in the quench can crack or even shatter a thin piece of steel such as a razor. So, the razor is not completely ground and finished before HT. Instead, final grinding takes place after the next operation, tempering. The hard Heat Treated steel is unfortunately very brittle, and tempering gives it some elasticity, springiness, and toughness. HT is done at extremely high temps, typically at or even above 1500 degrees. Tempering temperature depends not only on the steel alloy, but also on the desired final hardnes. Tempering can even be done in a toaster oven, because for a razor it is nearly always done at under about 420 degrees. Once tempering is done, the steel is hard, but tough and resilient. Final grinding thins the blade to final thickness, and removes any remaining tooling marks. Once the final grinding is done, the blade is too thin to survive another round of HT and quench. So, you get it right and if it's not right that's too bad. Excess heat will pull the temper, but the hardness can never be restored. It is a soft piece of razor-shaped junk. The basic rule of thumb is if the blade is too hot to hold in your hand then it is too hot. Also, tempering creates a colored oxide layer on the steel. A light temper barely changes the color. More, and you get a yellow or even straw yellow color. The color can further change through orange, brown, purple, and blue, in various hues and shades. At excessive temps caused by grinding, this color change happens in the blink of an eye. So before you even realize that there is a problem, you have the "Blue Stain Of Death", meaning that the razor is TOAST.
Water boils at 212 degrees. Boiling water is entirely too hot to hold. The lowest temperature likely to be used for razor steel is about 340 degrees, more or less, still quite a bit hotter than boiling water. So, if the razor never gets to hot to hold for a length of time, it is definitely not hot enough to be de-tempered. Or over-tempered, actually. If you practice holding your razor in your bare fingers while grinding, then, you should not have a problem with overheating the razor, EXCEPT at the edge. Thin steel heats quickly, because it has insufficient mass to absorb the heat. Thin steel can indeed be overheated whike holding the razor in your hand. The edge can get to 600 degrees while it is still comfortable to hold, because the mass of the thicker parts can absorb a lot of heat before getting too hot to handle. When you see the BSOD, Blue Stain Of Death, you went too far. I actually urge you to practice overheating a blade so that you see how easy it is to do. It only takes 2 or 3 seconds! That is for thin steel like at the edge. Thick steel can be ground for as long as 30 seconds, maybe. Dremel, he don't care. He just destroys, unless you stop him. Remember, overheated razors cannot be un-overheated. Once overheated, they are finished. Kaput. Ded. Ca-ca. Muy no bueno.
So, you have been warned. But you will use it anyway, or its big brother, the belt sander. USE EYE PROTECTION!!!!! Don't put your eye out. Oops is no excuse, and you don't get to rewind the tape and start all over. Take care of your eyes.
In I think the previous post, I posted a pic of a typical modded GD. Notice that the shoulder and stabilizer are gone, and a swoopy thumb notch is there instead. This re-profile I did with either the Dremel, or a belt sander, don't remember which but I think I only used a Dremel back when I did this one. A rough re-profiling of the blade is a good first step. The sanding drum attachment is very good for this step. You simply press the sanding drum, turning at 30kRPM or whatever speed, into the corner where the stabilizer meets the shank. The rotating sanding drum hollows out a perfect negative copy of itself. A nice round thumb notch is born. Occasionally the tool is moved along the edge of the steel toward the shaving edge, or back down the shank toward the pivot. For the most part it is kept right there where it can slowly eat away at the heel of the razor, including the evil stabilizer.
As I pointed out already, the steel can only take so much grinding at once, before you get the BSOD. So with only one razor, you might grind 20 seconds with occasional 1 or 2 second visits down toward the edge. Then the razor must cool down before grinding more. You could just stand there like a dummy and hold the razor. Or, you could dunk it in water or ice water and get right back to it. A more efficient way is to do a bunch of them at once. Do the first one, put it down and pick up another one. Do that one, put it down, pick up another one and another and another. 10 or 12 is a good number. When you get back to the first one again, it has cooled enough for another go at it. So, no time wasted just waiting for steel to cool. Continuous grinding instead of greatly interrupted grinding. Takes 3 times as long but you get 10 times as many razors!
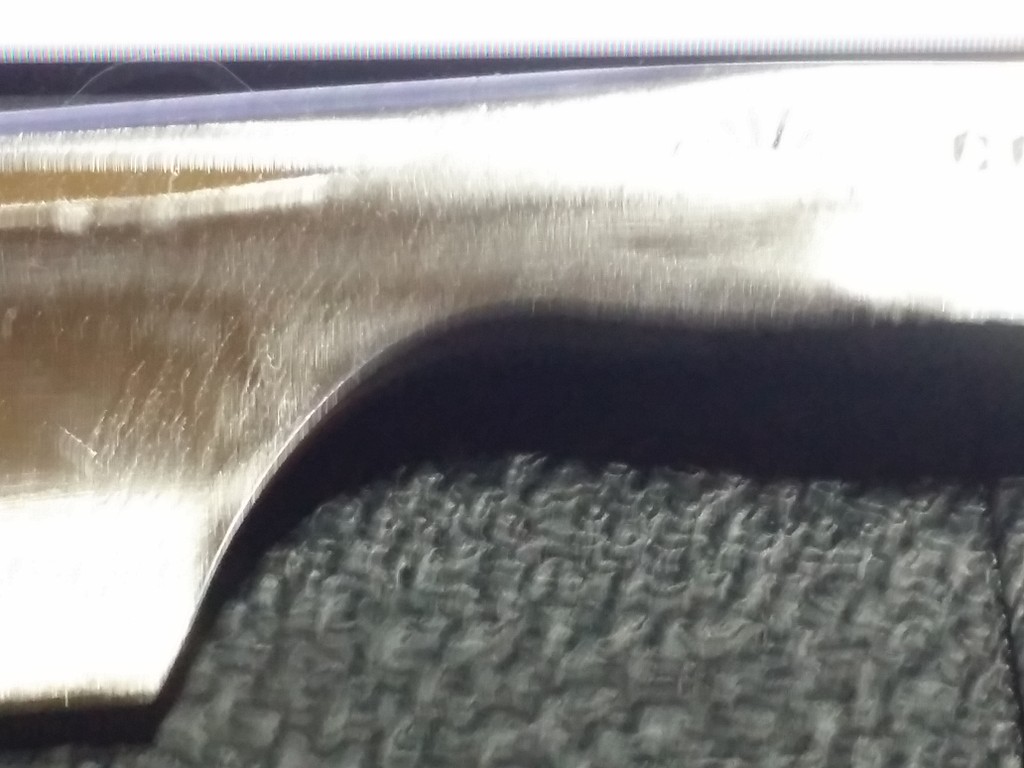
If you already have a bouquet of Gold Dollars and a Dremel or suitable knockoff, and a bunch of sanding drums, you may as well go for it. There is a pic at the bottom of this post showing a closeup view of a thumb notch where the notorious stabilizer used to be. The shoulder is also roughly faired away. For this step, you can even do the grinding with the scales still pinned to the razor.
As I mentioned before, the Dremel is not the only way to get this done. A more professional setup would involve a 72" variable belt grinder with a collection of wheels and platens and such, tool rests and fences, all sorts of adjusty thingies. Not as good as that but better than a Dremel is a variable speed dragster type belt sander clamped in a bench vise. Come on, Google that. The rear roller is normal size, but the front roller is much smaller, so you can get closer to stuff, the drywall when sanding a floor, for instance. In our case, the small radius is just right for creating thumb notches, and the flat part of the belt is great for fairing the notch into the new blade heel or the shank. I find the belt sander to be much better for this, and useful for many other operations in razormaking or razor modding or even restoring.
Thumbnotching eliminates most of the stabilizer. To completely eradicate it, and the shoulder, is part of this step. See the pic of the thumbnotched GD66. You can start this process with the sanding drum, to rough it in, and finish with the flap wheel. You could also do the rough work with the belt sander. You can check your work by hand sanding with 60 grit. It points out the high spots that still need to be taken down a bit.
Once you have thumbnotched a bunch of razors, you could in theory hone them up and shave, and do it with much more ease and efficiency than before, with the 700lb gorilla of a stabilizer in the way. Why not? Go ahead. Do one. Won't hurt anything, and you still got plenty more, anyway. If you thumbnotched the razor without removing the scales, you are good to go. Hone, and try to shave. Then hone some more and try again, haha! If you have never honed a GD66 you will be surprised how long it takes, to get the initial bevel set.
Okay, if you are reading this for the first time, you probably haven't even bought your bouquet of Gold Dollars yet. Or maybe you have only one or two. I solemnly urge you most cordially and insistently to right now, stop reading, get on ebay, and pull the trigger on a dozen. You should be able to get them certainly for under $5/ea. My best buy was 60 at $3.06 each, free shipping from China. As a first time buyer of a small quantity, expect to pay between $4 and $5 each, shipped. More than that, don't buy... keep looking. Try one of my old suppliers, www.buyincoins.com. Once you buy once, the next batch you will get a discount.
So, what are you waiting for? Wanna live forever, or what?
So, You have your thumb notches. That's a fine start. Now, start slimming the spine.
It is essential that the spine and edge remain in proper alignment. If seriously misaligned, when you set the bevel you will have problems. So you need to always, when removing steel from the edge, use the spine for a guide, and when removing steel from the spine, use the edge for a guide. The GD66 has a slight "smile" right out of the box. That means that when the razor is standing on edge, the two ends curve upward a bit. However, I prefer a straight edge. So I will hone a preliminary rough bevel on coarse sandpaper, starting with the central portion of the edge on the hone, and continue until a straight edge begins to form in the belly of the edge. As I continue to hone, the straight edge begins to extend outward toward the heel and toe. I stop before I am all the way there. I want some steel that must later be removed from the edge to remain, for now. It is sacrificial steel. I can ding that up and not worry about it. I can breadknife it slightly to dull it for safer handling, and no biggie.
The sandpaper is first glued to a flat substrate. I use the very lightest spray of Loctite or 3M spray adhesive. It creates no bulk that forces the sandpaper out of flatness. It also cleans up easily. The plate is a piece of heavy glass, or a polished marble "bullnose" edge tile, 4"x12", from Home Depot. There have been reports of these popular improvised lapping plates not being flat enough. So far I have been lucky but I am switching to glass anyway. Cut a standard sheet of sandpaper into thirds, longways, and stick one carefully to your plate. There must be no bubbles or wrinkles. Keep it stretched very tight as you apply it. Now you have a very coarse, very flat hone that cost almost nothing. So, hone a bit, keeping the middle of the edge on the hone, and no rolling x action. An x stroke, sure, but no rolling x. You are not trying to preserve, but to eliminate the smile. Keep plenty of pressure on the spine, too. That is, after all, the true objective of this step. Eventually a bevel forms on the spine. At first it will be hit or miss, due to the extremely careless grinding at the factory. The spine bevel will be very uneven and inconsistent. That is okay. You are forcing perfection onto a very imperfect object, so naturally it will not match exactly. Keep going, though. You want to force the bevel on the spine to be exactly in the same plane as the bevel at the edge. This new bevel will be your guide in everything you do.
When the edge is about 75% straight, apply pressure only to the spine. The edge is just along for the ride. You do not want to completely set an end to end bevel right now. You want some sacrificial steel to remain. You can even tape the edge at this point. Refresh the tape as needed. A thin sheet of steel folded over the edge is even better. It lasts longer. The lid from a large food can works. A coffee can lid. Just cut out a nice rectangle, bend and hammer or squeeze it tight over the edge, and bobs yer uncle.
This operation I should add, uses very coarse paper. certainly 150 grit or coarser. I like to start with 60 grit. A lot of steel has to go away. Ordinary alternating laps with light pressure will take forever. Hone in sets of 20 back-and-forth strokes on just one side, then the other, with a fair amount of pressure. The weight of your arm or a bit more is about right. Finger on the spine? Sure. Put the pressure where it belongs. Be careful to keep it in the central portion, not toward heel or toe. The idea is to get the spine flat and keep it aligned with the edge. Go, go, go! This is gonna take a while.
With a dial caliper, occasionally measure the spine thickness. To begin with it will probably be well over 0.240" but you need to get it down to about 0.215". You can cheat, here. With the belt sander clamped in your bench vise, rest the spine on the belt near the edge of the belt, and the razor edge off the belt, on the platen. The platen is the shiny metal plate that backs up the center part of the belt, between the front and rear rollers. The platen doesn't move, so it is not taking more steel from the edge. The belt is moving, so it takes steel from the spine. The razor edge is flat on the platen to the edge and spine remain somewhat in alignment. Go until you are down to 0.220" thick, then go back to the sandpaper plate to finish down to 0.215" thick. You want the thinned part to extend onto the shank a good ways, maybe 1/2" to 3/4" or so. If there is any shoulder left, you might need to put some pressure toward the heel, yeah, to keep it parallel. This is gonna take a while! Be patient. Put it down when you are tired, and continue another time or another day.
Remember how you made use of the front roller (assuming you used a belt sander and not the dremel) for making a nice rounded thumb notch? We can use the same radius to push the hollow grind up toward the spine. When your spine thickness is good, the spine bevel flat will be very very wide. The problem with that is that in ordinary honing, the spine presents such a large surface that thickness is lost very slowly, though steel from the edge is lost at a normal rate. So the edge wears quicker than the spine, creating an increasingly obtuse bevel angle over time. A heavy bevel angle is what we are trying to correct, here! The way to make the spine bevel more narrow, is make the lower edge of it disappear. A nice consistent hollowgrind can eat up the lower edge and leave a nice straight line. You can push it almost to the very top of the bevel flat, and you should. So, with the sander clamped in the vise and the front end pointing up, work the razor back and forth on the roller, emphasizing removal of steel from the spine as you work the roller side to side in the existing hollowgrind. Let the razor travel far enough that the hollowgrind is also extended slightly onto the shank. Watch what you are doing. Be aware of exactly what effect you are getting, and do what you got to do to adjust the outcome. The desired result is that the lower edge of the spine bevel ends up a nice straight line, even if the upper edge of the spine bevel is wavy. This new border should be very close to the upper edge of the spine bevel at its narrowest place. The blade will have a deeper and more extensive hollowgrind. Start out with a coarse belt, and finish with a 400 grit belt. You dont want to leave big gouge-y scratches behind. The blade and shank should blend together.
The spine is supposed to be the thickest part of the razor. It should at least be thicker than the shank where it joins into the body of the blade, so in normal honing the shank never touches the hone, and so cannot lift the heel off the hone. This is a prime goal. And so, the shank must be thinned enough that no part of it extends into the bevel plane. It must be thinner than the spine at the back, and still thinner at the front, in the thumb notch area. You can use the sandpaper plate and 60 grit, or you can use the belt sander, which I recommend. Get that shank thinned down to about 0.200" or 0.205" thick, and the very root of the spine, as well. You want the entire thickened part to rest on the hone when honing. This way, honing cannot form a step in the spine or shank that can cause problems if it gets on top of the hone. You will then have to wear a LOT of steel off in honing, to mess up the geometry. You probably can't do it in one lifetime. So you are creating a razor that will not only be dead simple to hone, but will stay dead simple to hone for a very long time. As with the hollowgrind job, finish with some finer grit, progressing up to maybe 400 grit.
Now you can grind the top and bottom of the tang, getting rid of factory imperfections, and those horrible jimps. Jimps are the tiny grooves sawn or ground into the shank to improve your grip. They are also a good place for rust to get a toe hold, and when crudely done, they are ugly. Also you don't have them in the thumb notch, so just get rid of them. You can roughly profile the nose to match the swoop of the thumbnotch, if you like. Smooth the top of the spine, too, and straighten out the top edge of the spine's bevel. Smooth it all up.
Check your bevel angle. Since you have some sacrificial steel on the edge, you want the bevel angle to be slightly more acute than the desired final bevel angle. If it is greater than the desired bevel angle, you need to grind some more on the spine and fix the hollowgrind again, and hit the shank some more. The objective at this point is to have a geometrically correct razor ready to scale, hone, and use, even if it is not pretty.
At this point you could decide that this is enough shaping, enough heavy grinding, and it is time to go for a finish, and scale it. If that is the case, get ready for a lot of hand sanding. The edge is quite vulnerable. You can protect it by laying the razor flat on a piece of pine or other soft wood. A piece of garden hose makes an excellent sanding block for the blade. It conforms nicely in the hollow grind, and flexes a bit when it travels down onto the shank a bit. Another good technique is to pinch the blade in a small piece of sandpaper and run the blade back and forth within. Be sure that the edge is turned out AWAY from the sanding hand! A dull razor can still deliver a crippling cut to the web of the hand! I like the pinching technique because it does not flex the blade at all, even with a lot of pressure. Start the finish process with maybe 150 grit. The starting grit must do the bulk of the steel removal. All sanding or grinding leaves scratches in the steel. Finer grit leaves shallower scratches. Coarser grit, deeper and wider scratches. The scratches represent steel that has been removed. The first stage grit must get rid of ALL grinding marks or imperfections, and leave the entire razor at one consistent finish level. Totally. TOTALLY. If you want to sand the spine nice and round, eradicating the bevel flat, this is the time to do it. All corners, all edges, (except of course the shaving edge!) are sanded smooth in the opening step of the finish. Be patient. Do not progress into the next grit until the first one has COMPLETELY done its job! It is SO inefficient to go back and hit it later! If in doubt, sand some more.
The next stage must totally eliminate the first stage scratches, replacing them with its own finer scratches. You must not leave any first stage scratches behind, because it will take a LOT of time to clean them up with a finer grit. As you go finer, the abrasive cuts slower and slower. Less and less steel is removed. Trying to take the vestiges of 150 grit scratches out with say 600 grit will take days or weeks. Be patient. Do not bump it up a grit until the current grit has absolutely completely done its job. I simply cannot overstress this. If you want a stunning mirror finish, you must do it this way.
Keep progressing through the grits to 2k or 3k grit. At 2k you have a very lustrous finish. You could stop there and nobody would blame you. However, you can do better than that. Chuck a cloth or felt wheel attachment into the dremel. Smear on a tiny bit of 3u diamond paste, and spread it around on the razor between pinched fingers. If you don't have anything coarser than 1u, start with 1u but be prepared to spend some time with it. It is about a 6x jump from 2k to 1u! The wheel picks up the diamond paste and works it on the razor. Make damn sure the wheel is always turning off the razor's edge, and not onto the razor's edge! It is absolutely guaranteed to catch the edge and shatter the razor, which would be SO tragic after all that work on it! Use very light pressure and keep it moving around. Laying the razor on your soft pine block will help a lot. You can easily overheat the steel in this operation, too, so remember, keep it moving. Light pressure. Do every surface. Completely polish out all of the 2k scratches.
Progress as with sandpaper, through 1u, .5u, .25u, and .1u. 1u is 1 micron. The letter "u" actually does not stand for micron... it is just an approximation of the Greek letter "µ" which is the proper symbol. A micron is a millionth of a meter, or a thousandth of a millimeter. You MUST NOT use a wheel again for a finer grit. It is already contaminated with the coarser grit and will not polish to the higher standard, no matter how you try. Keep your wheels seggregated according to grit. Always carefully wipe the razor and all work surfaces absolutely clean of all grit when progressing to a new grit! Wash your hands thoroughly, too. You save a lot of time in this step by doing a batch of several razors. Hopefully you listened to me, and are doing 10 or 12 razors at once.
When you finish dremeling at the .1u level, put the dremel away. Hand polish using a tiny amount of .1u paste and a small scrap of old tshirt or tighty whities. Use the pinching technique. Light pressure. Spend several hours on this, no less. Wipe the razor clean and admire it. You should have an amazing mirror finish.
But, let's say you wanted to further refine the razor before all that finishing stuff. You can thin the upper portion of the blade somewhat, if desired, and make the razor truly sing. A sanding jig can be made, by assembly or even by 3d printing. A graduated set of different spacings can be used to gradually thin the razor. You should also make any last minute corrections to the profile. More swoop, barber notch, reprofiled nose, new jimps, whatever. You can also set a more complete bevel. It is okay to tape the spine in this stage if your spine is thin enough. Go ahead and extend that nice straight edge from heel to toe. After finishing and scaling, it will be ready for final honing and use.
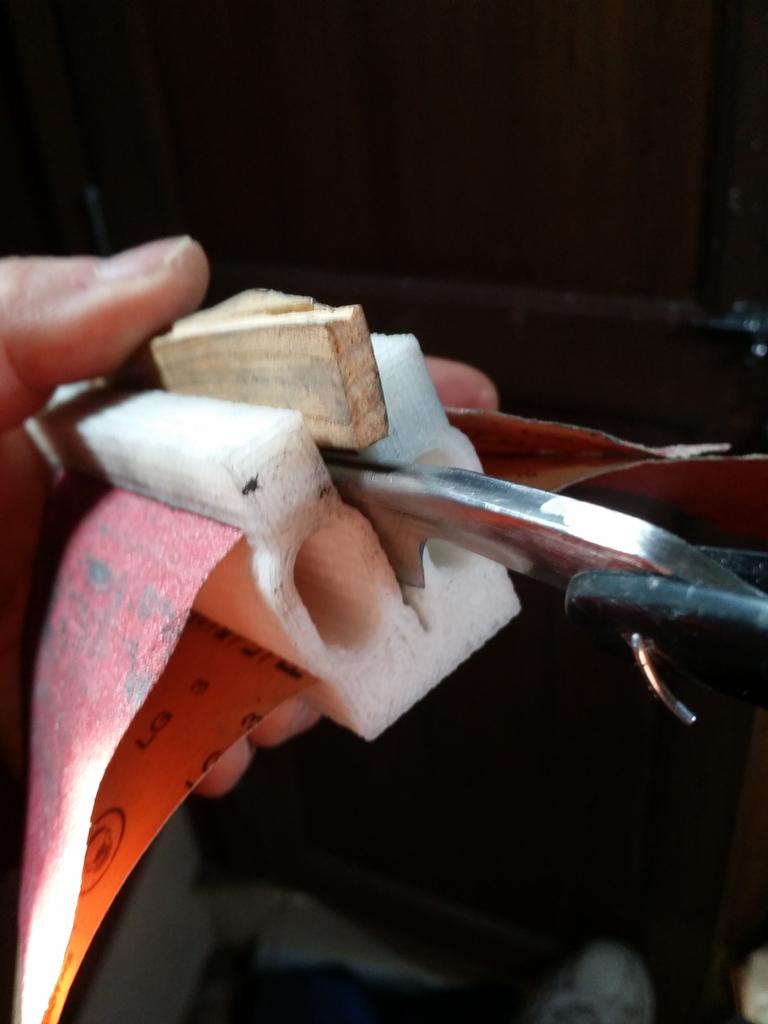
Below is a sanding/thinning jig I 3D printed, in action. This one is sort of sophisticated. The piece of wood is a pressure block. The sandpaper goes around a squashed cylinder shaped core and back out again. I can feed it little by little, every 300 strokes or so. It has a twin core on the other side where another strip of sandpaper is fed. The idea is to gradually even out the hollowgrind and press it deeper into the steel, thinning the body of the blade and making a finer higher grind. Instead of a half hollow, I can create a true singing extra hollow using a progression of jigs with ever tighter clearance. As you can see, the razor is temporarily pinned into the stock scales just to have something there that gives me a more secure grip. Resistance is considerable, when applying pressure with the pressure block.
For the technically minded, you could take a large stepper motor and build a reciprocating powered grinding machine with such a jig. Best to have the grinding take place under water or with running water to keep the razor cool, and some sort of reel or spool mechanism for advancing the sandpaper. If done underwater, the sandpaper will not load as much and will last longer. The razor can be thinned WAY down in hours instead of days. Just sayin.
At this point your razor should be ready for scales, and for final honing.